TI Code Composer Studio
This article describes the usage of TI Code Composer Studio (CCS) in combination with J-Link.
Minimum CCS Version Requirements
In order to use J-Link with TI CCS, min. V6.1.3 of TI CCS is required. Earlier versions might work but are not guaranteed to do so. Please understand that SEGGER does not provide any support for CCS versions earlier than V6.1.3. As the specific implementation of J-Link support differs slightly depending on CCS version, the following sections will describe using J-Link for each supported generation of CCS.
TI CCS Version V20 and newer
J-Link support in TI CCS V20 is included in the default installation and should work out of the box. You can confirm that J-Link support is included in your installation by opening a target configuration CCXML file and looking for SEGGER J-Link in the list of Connections:

Using TI CCS with J-Link
Configuring a Project for J-Link
This section applies to TI CCS version V20 and newer.
- Open the project to configure
- Open the target configuration CCXML file under targetConfigs.
- Make sure that SEGGER J-Link Emulator is selected under Connection. In case this was changed, save the CCXML file.
- Optional: Change target interface and speed, specify custom J-Link script files and override the log file path.

Ready for debugging
Now the project is ready to be debugged with J-Link / J-Trace.

Multi-core devices
For multi-core devices, a specific core to be debugged needs to be selected when launching a debug session. This can be done by selecting the corresponding J-Link device in the pop-up GUI window which appears when launching a debug session:

At the moment, J-Link support in TI CCS only allows one core connection at a time.
Troubleshooting
SEGGER J-Link is listed as a debug connection but can't be selected
- This happens if J-Link does not fully support all debuggable cores of a given device. If the device itself is supported by J-Link (J-Link Supported Device List) but can't be selected in TI CCS, please open a support ticket so that we can take a look at the issue.
Pop-up: The selected device is unknown to this version of the J-Link software

- For some devices, the device name used by J-Link slightly differs from the device used by TI in the target configuration. Simply click "O.K.", and then select the correct device in the list of devices.
TI CCS Version V12 and older
Adding J-Link Support at Installation time
For more information regarding older versions of CCS: Adding J-Link support to older CCS versions.

Updating J-Link inside CCS
The J-Link plugin can be automatically updated as any other Eclipse plugin. A manual update can be triggered via Help -> Check for Updates.

Updating the plugin manually
J-Link CCS plugin can be updated manually.
- Download and extract the J-Link CCS plugin
Download link - In CCS go to Help -> Install New Software...
- Click Add...
- Click Local... and select the extracted folder
- Click Add
- Select the desired plugins (Windows/Linux/Mac) and click Next >, Next >, Finish
- Restart CCS to complete the installation
- To check if the correct plugin version is installed go to Help -> About Code Composer Studio -> Installation Details and check the entry for SEGGER J-Link Support
TI CCS V12 and older
This section applies to TI CCS version V12 and older.
Configuring a Project for J-Link
In the following, a short step-by-step tutorial on how to configure a Code Composer Studio project to be used with J-Link, is given.
- Open the project to configure
- Open project properties by clicking Project | Properties from the main menu and go to the General tab
- Make sure that the proper device is selected
- Make sure that Segger J-Link Emulator is selected as connection type

Ready for debugging
Now the project is ready to be debugged with J-Link / J-Trace.

Using J-Link Script Files
- Make sure that J-Link CCS uses at least J-Link software version V6.20g
- Open the project
- Switch to the Project Explorer, browse to %PROJECT_NAME% --> targetConfigs and open the active target config with *.ccxml extension (e.g. CC2650F128.ccxml)
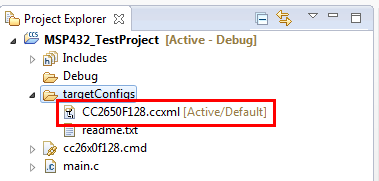
- Select the Cpu properties (see screenshot below)
- Switch to the Advanced tab (see screenshot below)
- Select the desired J-Link script file in the Cpu Properties tab --> J-Link Scriptfile Path (see screenshot below)


Setting a breakpoint while the target is running
Per default a TI CCS project is in a so-called "non-intrusive" debug mode. In this mode CCS will not set any breakpoints while the target is running, because this could effect realtime behavior as the target needs to be halted before setting a breakpoint.

It is possible to change this behavior. To do so, the following steps are necessary:
- Open your project in TI CCS
- Navigate to the Project Explorer
- Open the properties of your project (right click on the project -> Properties)
- Activate the intrusive mode: Debug -> Auto Run and Launch Options -> Realtime Options -> set Halt the target before any debugger access

Adding J-Link support to older CCS versions
In order to get started with J-Link and CCS, please make sure that latest SEGGER software and documentation pack is installed, which can be downloaded here.
Adding J-Link to Available Software Sites
- Open CCS
- Open Window | Preferences
- In Install/Update select Available Software Sites
- Press Add...
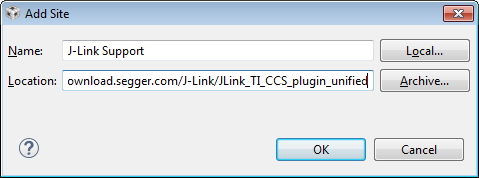
- Enter "J-Link Support" as Name
-
Add the following URL as Location:
https://download.segger.com/J-Link/JLink_TI_CCS_plugin_unifiedNote:
The link is not browsable. Please do not try to download the plugin via your browser from the link above. The plugin is downloadable and installable via the TI CCS update interface only. - Press OK


Installing J-Link
- Open Help | Install New Software
- In Work With: field: Choose "J-Link Support" from the drop down list
- Check J-Link support
- Click Next
- Click Next
- Click Next
- Accept the license
- Click Finish
- Restart TI CCS

Using J-Link in a project
- Open the target configuration (.ccxml file in the project)
- View | Target Configuration can be used to find the target configuration file if necessary
- In the Connection field choose "SEGGER J-Link Emulator" from the drop down list
- Check the correct target in the list below
- In the Advanced tab, additional settings are configurable , e.g. the JTAG speed
- The project is now ready to be debugged with J-Link

Connecting to a J-Link via Ethernet
Problem
In current versions of the TI Code Composer Studio (CCS), the host interface to the J-Link (USB / Ethernet) can not be specified in the project settings.
Work-around
The J-Link DLL allows to override the used host interface using the J-Link Commander String SetHostIF. This command string can be passed to the J-Link DLL using the J-Link Script File function InitEMU(). Please find below an example J-Link Script File, which forces the J-Link DLL to open a connection to the J-Link via IP (192.168.104.174). How to use J-Link script files in CCS is described in the article below.
File:JLinkOverrideHostIF.jlinkscript
- The work-around can be used with any J-Link with Ethernet interface.
- Native host interface selection, using the GUI in CCS, is planned for future versions.